Made with bytes.
The deployment black box, Mercurio
Tue 19 February 2013
Write tests, deploy often and iterate quickly.
Automation is the best, because once a task has been automated the machine won't forget to run any of the steps required, and that will give me more time to tackle other challenges instead. Deployments are one of my favourite things to automate because when done well it facilitates quick iterations on the application.
For a while I have been thinking about creating a deployment box, the kind of box that you push a button and then the computer works its magic, and then your site is up and running. Finally I managed to set aside some time to work on this project and learn a bit more about arduino during the process.
Introducing Mercurio
Mercurio is a set of components designed to transmit a message to a host and perform an arbitrary action with the push of a button from a black box while encouraging good development practices.
I use the box to trigger my deployments and run my test suite but with the schematics and the code released it should be easy to adapt it to do whatever you want. Deploying a man on the Moon? Maybe not.
Mercurio has two main components:
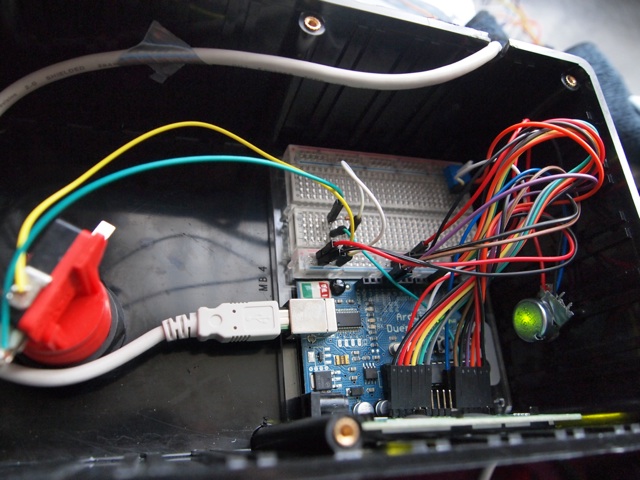
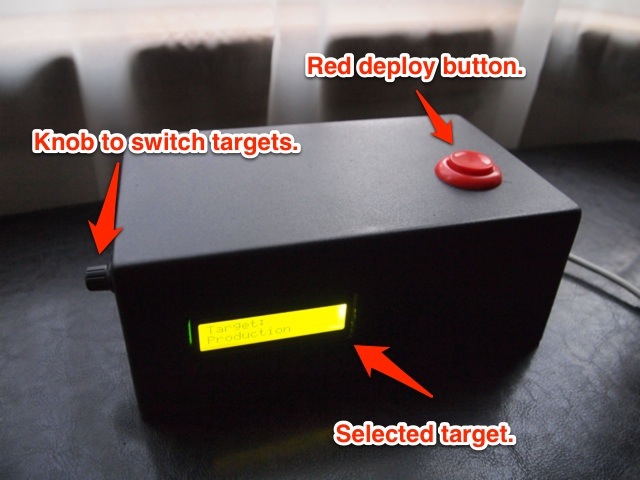
The hardware, which consists of a black box containing every bit necessary for the analog interaction (the red button).
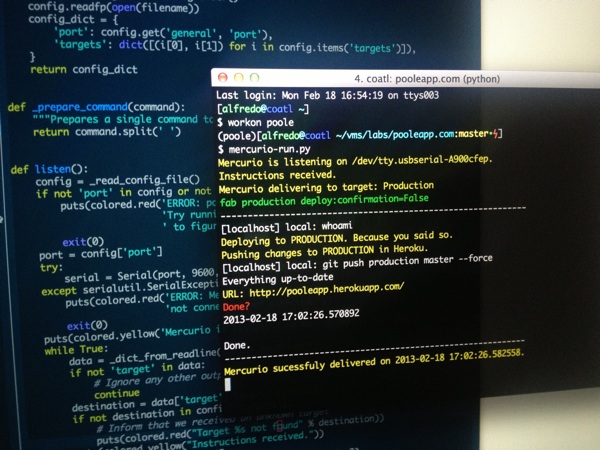
And the software: a python listener which will translate the button push into a concrete action on the host.
Because mercurio is decoupled from any specific tool it can easily be adapted to play well with whatever workflow you have. By the way, if you aren't using any tool for automating repetitive tasks I suggest you start looking into it. Trust me once you start automating you won't be able go back to do things manually and the more you do it the better you get at it.
Targets
Mercurio uses a knob to switch between targets and the selected target is shown in the LCD screen. The targets available are:
- Test
- Staging
- Production
These targets match the environments I use in my projects but they can be easily tweaked.

Test is used for running the test suite.
Staging and Production are used to deploy to the selected enviroment.
You'll notice that the Development environment is missing and that is because it should be already deploying the application continuously without any human intervention.
Hardware: The black box
The black box has been designed to allow the selection of a target and to let the listener know when the button has been pressed.

Building your own black box shouldn't be too complicated; even if you are starting with arduino development. The components used for replicating this box are:
- An arduino duemilanove or superior.
- A breadboard.
- Several jumper cables.
- An USB Cable A-B.
- A LCD display (16 x 2).
- Two 10k Ohm potentiometers.
- One 10K Ohm resistor.
- An analog microswitch with a fancy button.
- A durable box for hold all the bits together.
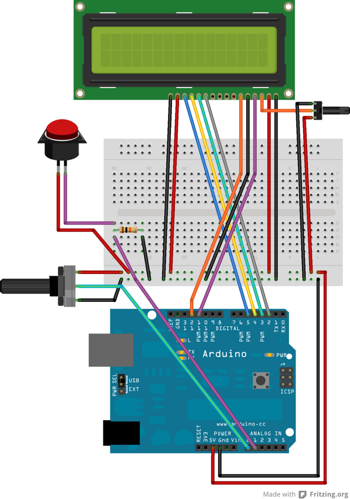
And the schematics I created for joining these bits together are:

Image developed using Fritzing.
Think of this diagram as legos. There are three components made with the previous bits: The LCD screen and its contrast knob, an analog microswitch and an analog knob, and they are glued and coordinated by the arduino.
The arduino sketch for the hardware and more detail about the black box can be found in mercurio's github repository
Software: The listener
This is a single python process running which listens on a serial port then executes the specified command for any given target via subprocess.call. The listener is configured via a mercurio.cfg file.

More detail about the listener and its installation can be found in the mercurio listener github repository
Configuration: mercurio.cfg file
Once the black box is assembled and the listener installed, mercurio is ready to be run. But we need to configure it, this is done on a per project basis because there is the possibility that you use different tools for different projects.
A mercurio.cfg file is used to configure the runner. This file must be placed where you intend to run the command to start the listener. It consists of two sections general and targets.
Under the general section the port must be specified. This will be used by the listener to hear from the black box. I opted for the port to be specified instead of trying to guess where it is connected.
The port where the box has been connected can be determined by running the following command; this will show you the list of serial ports available.
# python -m serial.tools.list_portsUnder the targets sections the list of targets should be declared. They must match the targets available in the black box, by default: test, staging and production.
The command specified after the target will be executed when the black box says so. At the moment the command functionality is a limited but if you use a tool like fabric you should be fine.
This is a sample configuration I use to test and deploy on one of my projects.
[general]
# Port where the black box has been connected
# Use python -m serial.tools.list_ports`` to determine it.
port: /dev/tty.usbserial-A900cfep

[targets]
# Command to be run when this destination is targeted.
test : fab test
staging: fab staging deploy
production: fab production deploy:confirmation=False
And that's it, all that needs to be done now is plug the black box to the computer and run the mercurio listener:
# mercurio-run.pyIt will give you some feedback and tell you that the box and the listener are talking to each other and you are ready to deploy, test and have fun (if you are into pressing buttons or automation, whatever floats your boat dude. I am not judging you).
Mercurio instructions
Now this is the tricky bit, the instructions on how to use it.
1. Select a target with the knob.
2. Push the red button.
3. Enjoy seeing mercurio seeing do its thing.
4. Iterate
Conclusion
Automation is great, it will make your life easier especially while executing mission critical operations because once a task has been automated and you know that it works, it will give you peace when you need to perform this task (even during a crisis).
Automation can also reduce the friction between you writing the code and it being deployed in production. If you make it easy and fun to iterate this cycle you'll find yourself doing more and more iterations and this will be translated into a better product.
Arduino was a great help to create mercurio seeing it take analog readings and turning them digital is so much fun.
The box and the listener can be improved in lots of different ways and I would love to hear your ideas on how to do it.
If you have any questions or you would like me to explain further any of the bits I mentioned in this write up let me know and I would be happy to do it.
Discussion in Hacker News.
Frequently Asked Questions
Q: Has it been completely demagnetised?
A: I'll give my answer in a video form.
Q: What is the license on the components?
A: Both components have been released under the MIT license, modify them, use them and create something really cool.
Q: Why did you choose that name?
A: Mercurio is spanish for Mercury and he was good at delivering messages.
